Putting Your Homebrew on Draft

There are many important decisions a homebrewer must make when crafting beer at home like whether to use dry or liquid yeast? Brew with extract or go all-grain? Use pellet or whole leaf hops? Each decision is what makes each brewers creation unique. Another big decision that has to be made, and one of the most over looked aspects of home brewing, is the serving of one’s home brewed beer.

To Keg or To Bottle...

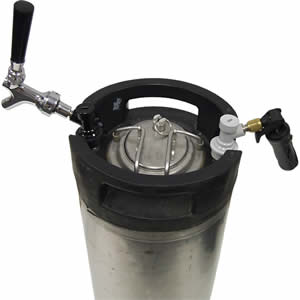
homebrew keg
Homebrew keg fitted with CO2 charger and portable faucet assembly allows you to dispense your brew without bottling.

Bottles are portable, store well and are great for certain situations like competitions, bottle swapping among clubs and bottle aging/conditioning, but sometimes bottling can become a very time consuming and messy affair just for home enjoyment.

If you are like me, I quickly became interested in kegging my homebrew and dispensing it from a draft beer dispenser. Kegging seemed to be a lot faster and cleaner process. I also was able to fill growlers when I needed to take beer with me for sharing.

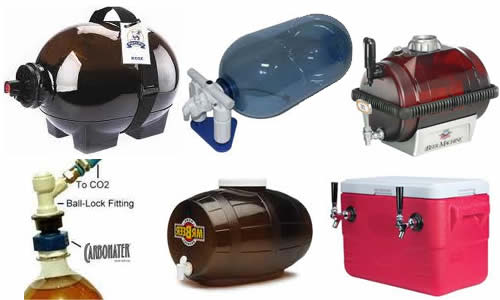
Having tested basically all of the mainstream portable and non-portable home brew dispensing set-ups (Keg w/ portable CO2 Charger, Jockey Box, Carbonater Cap, Mr. Beer, Beer Machine, Tap-A-Draft, Party Pig, etc) I found that for home use modifying a kegerator gives you the most bang for your buck. Many home brewers I have the pleasure of knowing have also found that stepping up to commercial grade kegerators to serve their home brew is a far more expedient approach with the least amount of maintenance.

Plastic homebrew dispensers
Plastic serving vessels can be an inexpensive alternative to a steel keg dispensing kegerator for serving and dispensing home brew at home or on the go.

There are a few ways I can think of to go about converting a kegerator into a homebrew dispenser. You can change out the tap fittings to accommodate soda kegs or you can install quick release fittings so that you can easily switch out between commercial Sanke kegs or soda kegs. I prefer that latter, as it leaves open the possibilities of serving both commercial beer and home brew. If you have two taps, you can also serve from both types of keg at once. I have also seen home brewers keep the kegerator’s fittings the same and keg their homebrew into the bigger 15 gallon regulation kegs. This requires some special equipment, so it may not be the most economical approach.

Changing out Sanke Tap Fittings for Cornelius (Soda) Keg Fittings

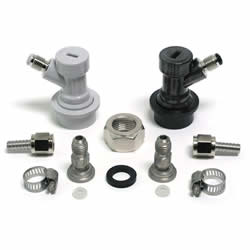
MFL quick disconnect fittings
Homebrew keg fittings with quick disconnects allow you to switch between homebrew and commercial style kegs.

Whether you are changing out the taps on a commercially produced kegerator or a kit-built conversion style kegerator, it will be pretty easy to change out your tap setup with just a screwdriver, pliers, cutter or a knife or some sort. If your beer line has some fittings on the end already, you will want to cut those off. Try to cut a minimal length of beer line off when you do this, because the length of the beer line is important to maintaining a foam-free flow of beer. After you have removed the regulation Sanke keg fittings, if any, you can attach a soda keg barb fitting to the end of the beer line with a hose clamp. This completes the beer line end of the conversion, but you also need to address the CO2 end.

CO2 lines are usually of a smaller diameter than beer lines (1/4” as opposed to 3/16”), but the process is basically the same as changing out the fittings for the beer lines. It does not matter as much if you cut the line shorter on the CO2 side, but it is a good idea to leave as much line as you can just for ease of changing out kegs.

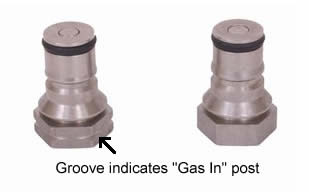
One problem that arises with ball lock style Soda kegs is that it is easy to confuse the gas with the liquid fitting when attaching the fittings to ball lock kegs. The two fittings are very similar, so it is best to identify them by the "gas-in" groove or by putting them on the keg. If you have to force the fitting on, you have switched the gas and liquid fittings. I have messed up some of my earlier home brew dispensing by accidentally switching these two fittings, which can cause beer leakage, keg contamination, CO2 loss, pressure problems, over foaming of the beer, and can also ruin plastic fittings and rubber o rings.

You can order quick change fitting kits from homebrew suppliers that are officially “food grade” which is preferred. Also if purchasing in a local homebrew shop, it is a good idea to check that the barb fittings will screw into the quick change coupler before you leave the store. Thread tape will ensure that you have a good connection between your couplers and hose barb fittings. Always wind your thread tape in clockwise on male ends – you might want to use yellow thread tape on the beer line joint because of the beer’s alcohol content, but white thread tape will work for a while at least.

Another option, if you have a freezer style conversion kegerator (Keezer), or a large refrigerator style conversion kegerator, is to install a splitter or manifold that allows you to dispense both a commercial Sanke keg and a Soda keg with home brew at the same time. This modification is not very different from the process described above, except that you will need to install a splitter coming off of your CO2 setup. If you are planning to serve beers that require different levels of CO2 push, you will need either a manifold with separate regulators or to just have two CO2 canisters and manifolds in the kegerators cooling chamber.

Christian Lavender Christian Lavender is a homebrewer in Austin, TX and founder of Kegerators.com and HomeBrewing.com

Related Homebrew Tips :
DIY Homebrew Dispensing Table -- Dispense homebrew directly from a table tower.
Build a Homebrew Cooler Dispenser -- Learn how to convert a five-gallon cooler into a beer dispensing cooler.
Homebrewer's Bar Plans -- Step-by-step homebrew bar plans designed for homebrewers by homebrewers.